October 22, 2025
Updated: November 4, 2026
Learn how to perform effective Kubernetes penetration testing. Step-by-step guide covering enumeration, common attacks and misconfigurations.

Hazem El-Sayed
Kubernetes (K8s) has rapidly become the de facto platform for container orchestration, enabling microservices, scalability, resilience and portability. From a security testing point of view, it introduces a new attack surface — clusters, nodes, pods, containers, APIs, role-based access — and one that standard cloud penetration testing has to be scoped specifically to cover.
Service meshes add another layer to test; see what a sidecar proxy is.
This guide also covers the software supply chain that feeds the cluster: container image testing (base images, container vulnerability scanning, SBOMs, signing and admission control) and container registry security (access, immutability, pull-through caches and image provenance). A cluster can be well configured and still run a vulnerable or tampered image, so a complete Kubernetes penetration test checks both.
Kubernetes shifts much of the application infrastructure into a highly dynamic environment: ephemeral containers, pods that scale up/down, complex networking, inter-pod communication, control‐plane APIs, etc. If misconfigured or poorly secured, an attacker can discover cluster metadata, expose etcd (the cluster’s key‐value store), exploit open APIs, or elevate privileges via mis-set role-based access control (RBAC).
Before diving into tests, it helps to get familiar with the basic terminology:
Getting these terms solid helps you follow the later attack surfaces.
Start with externally available information; this phase avoids touching the target network:
Public scans & search engines: use Shodan/Censys and CT logs to find domains, hostnames and certificates that indicate Kubernetes components
Below is a list of keywords to search with these tools:
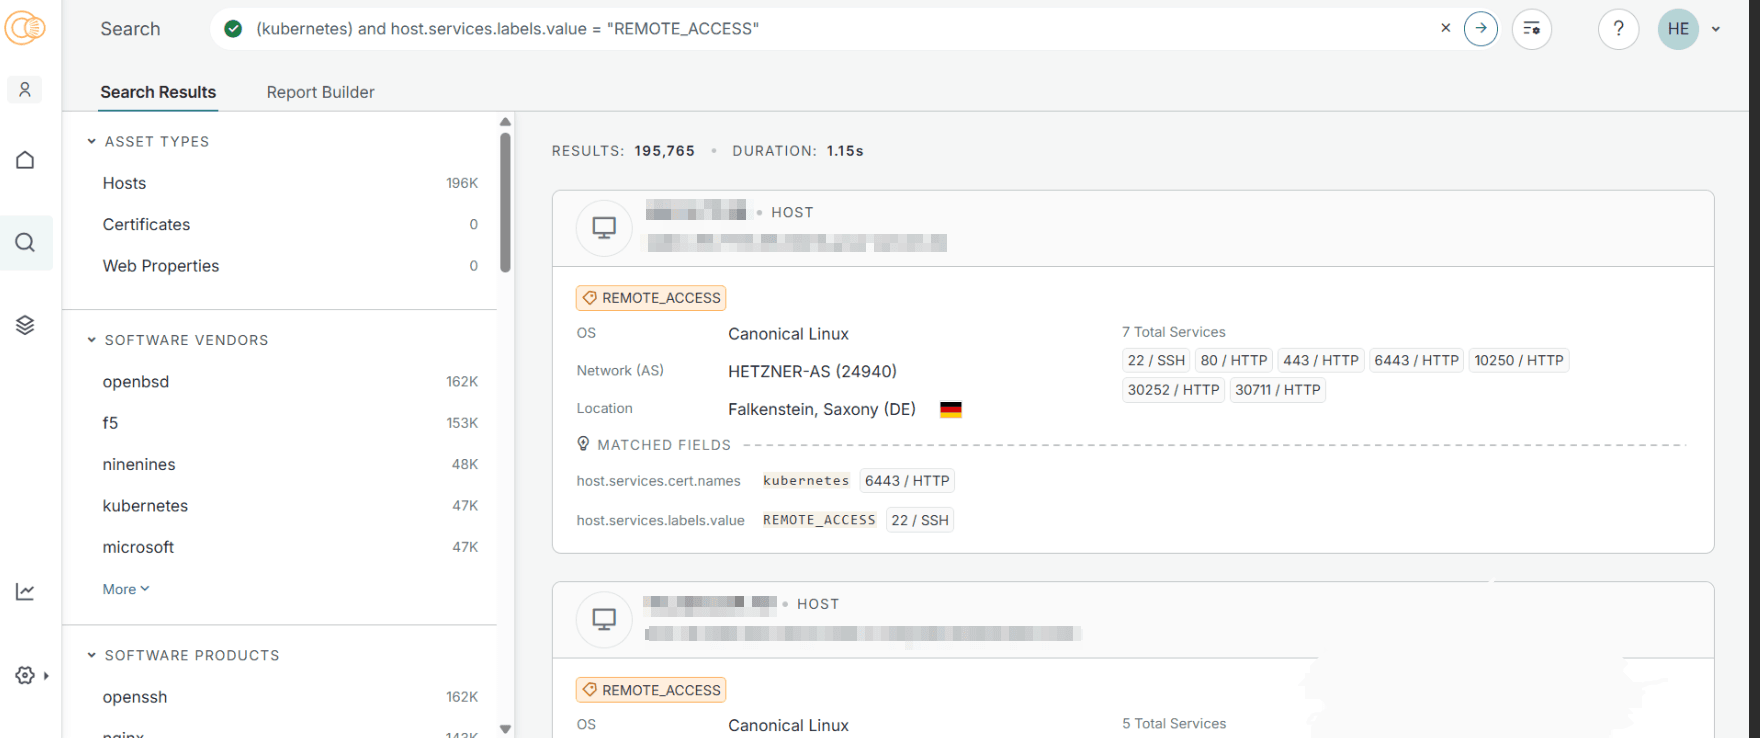
Searching in Censys
Cluster management can be performed using tools like the Kubernetes dashboard, Weave Scope, and Lens. These applications add capabilities and offer graphical interfaces for the Kubernetes environment. Search engines like Shodan and Censys are useful for discovering improperly secured dashboards. Authentication is typically needed for these dashboard interfaces.
Here is an example to search in CT logs like crt.sh
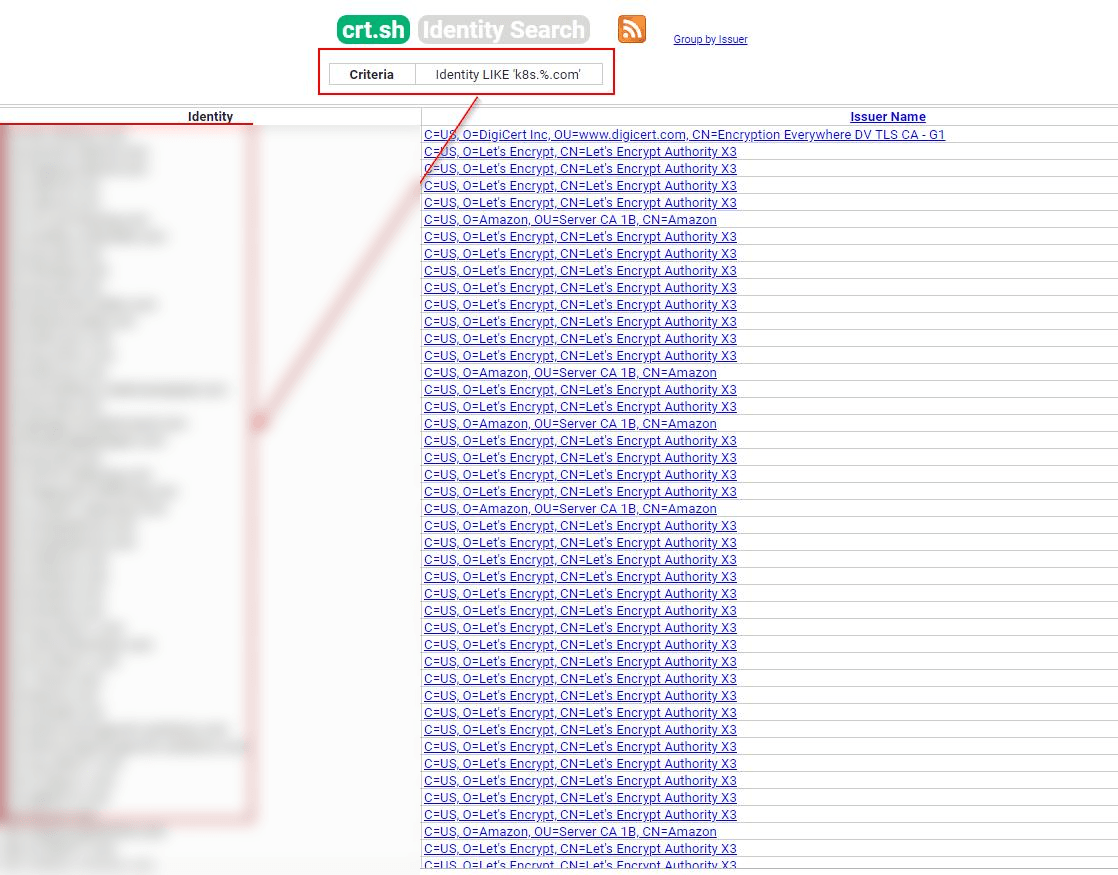
Search in CT Logs using crt.sh
Public repos & config leaks: search GitHub/GitLab for yaml/yml manifests, Helm charts, or CI/CD configs containing cluster endpoints, tokens, or credentials.
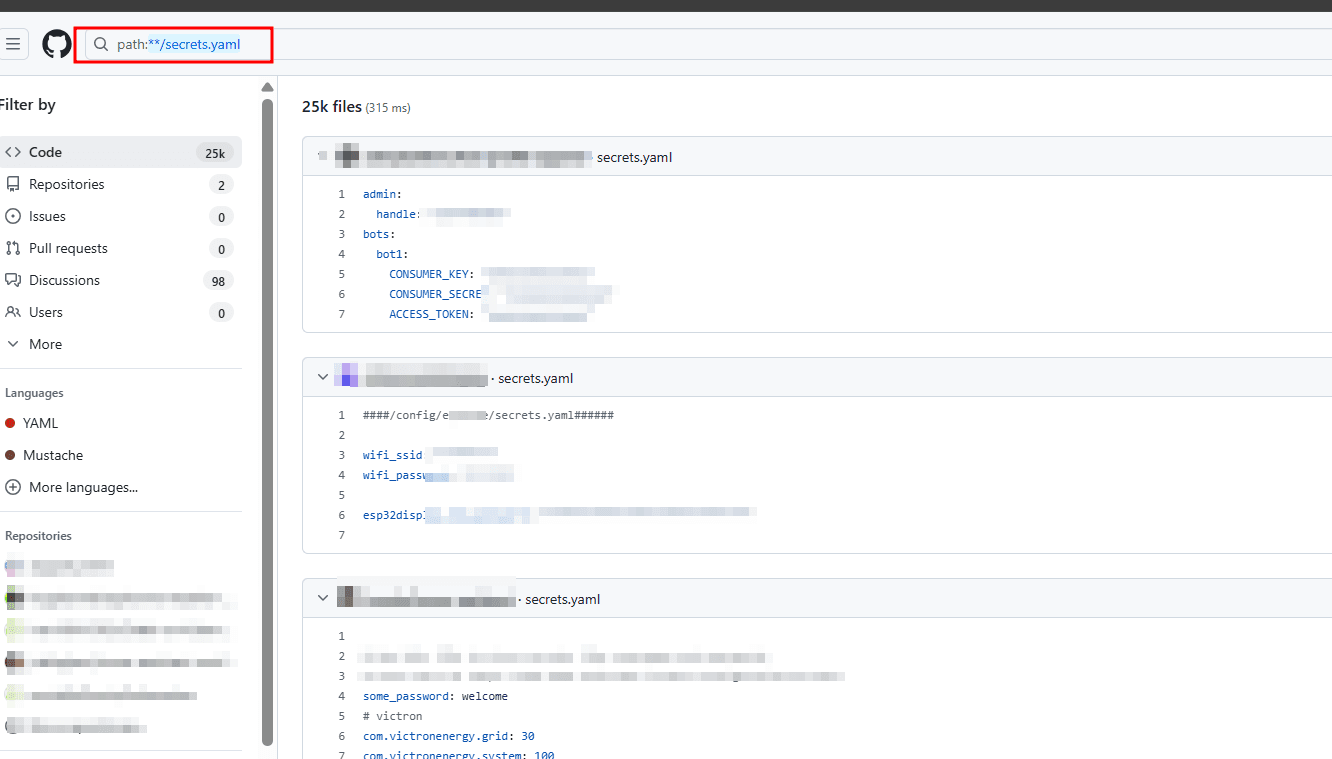
Searching in GitHub for leaks
What you’ll likely find: Secrets and leaked credentials, and publicly visible config files.
If passive discovery yields IPs/domains, move to live probes:
Here are the common exposed ports for Kubernetes clusters:
| Port | Process | Description |
|---|---|---|
| 443/TCP | kube-apiserver | Kubernetes API port |
| 2379/TCP | etcd | etcd,etcdAPI |
| 6666/TCP | etcd | Non-default etcd port listed in some pentest port references; Kubernetes documents etcd on 2379-2380/TCP |
| 4194/TCP | cAdvisor | Container metrics (legacy: kubelet cAdvisor port removed in Kubernetes 1.12; check only on older clusters) |
| 6443/TCP | kube-apiserver | Kubernetes API port |
| 8443/TCP | kube-apiserver | Minikube API port |
| 8080/TCP | kube-apiserver | Insecure API port (legacy: no longer served since Kubernetes 1.20; check only on older clusters) |
| 10250/TCP | kubelet | Kubelet HTTPS API; exec/run access if anonymous auth or weak authorization is enabled |
| 10255/TCP | kubelet | Unauthenticated read-only HTTP port: pods, running pods and node state (disabled by default in current kubelet config) |
| 10256/TCP | kube-proxy | Kube Proxy health check server |
| 9099/TCP | calico-felix | Health check server for Calico |
| 6781-6784/TCP | weave | Weave Net CNI: 6783/TCP control (6783-6784/UDP data), 6781-6782/TCP Prometheus metrics, 6784/TCP local command port (should be bound to localhost). Weave Net is archived and no longer maintained, so expect it mainly on older clusters |
| 30000-32767/TCP | NodePort | Proxy to the services |
| 44134/TCP | Tiller | Helm service listening (legacy: Tiller was removed in Helm 3) |
https://<host>:<port>/api/v1, https://<host>:<port>/healthz, or /openapi/v2 (or the legacy /swaggerapi on very old clusters) to see if the API responds and whether authentication is enforced.http://<ip>:10255/pods may list running pods and helpful metadata.Practical example (conceptual, follow legal rules before running any command):
curl -k https://<api-server>:6443/api/v1 Does it return anything without auth?curl http://<node-ip>:10255/pods Does the read-only kubelet port list pods?etcdctl --endpoints=http://<etcd-host>:2379 get "" --prefix --keys-only Does it return keys?Below is a prioritized checklist with what to test, the risk each item represents, and common indicators of compromise or misconfiguration.
What to test
/api/v1/secrets, /apis/rbac.authorization.k8s.io/) accessible?Why it matters
The API server is the cluster’s control plane; unauthenticated access can allow reading resource definitions, secrets, or even creating resources.
Indicators
curl https://<api>:6443/api/v1 returns JSON without auth.Remediation pointers
What to test
Why it matters
etcd stores cluster state and often secrets. Unprotected etcd = full cluster compromise.
Indicators
etcdctl return keys or values.Remediation
What to test
Why?
Read-only kubelet can leak pod metadata, file locations, container images. If write operations or CVEs exist, kubelet could be abused to execute or escalate.
Indicators
/pods, /containers, or file reading endpoints via kubelet.Remediation
What to test
Why?
Dashboards often run with elevated permissions and can be used to view secrets or create workloads.
Indicators
kubernetes-dashboard, cAdvisor, or network plugin UIs reachable.Remediation
What to test
Why?
Service accounts often act as the identity of a pod. Overprivileged tokens are an easy path from pod to cluster admin.
Indicators
automountServiceAccountToken: true where not needed, broad ClusterRoleBindings.Remediation
What to test
Why?
Secrets in repo or etcd lead to credential theft and lateral movement.
Indicators
/api/v1/secrets listing.Remediation
Every pod runs an image, and the image decides much of what an attacker finds after landing in a container: the packages, the user, the shell and any leftover credentials. NIST SP 800-190, the Application Container Security Guide, groups image risks into five categories: image vulnerabilities, image configuration defects, embedded malware, embedded clear text secrets and the use of untrusted images. A Kubernetes penetration test should check each one, and then check whether the cluster can refuse an image that fails.
For runtime hardening against the CIS Docker Benchmark and NIST SP 800-190, see our container security guide.
The checks below are conceptual and read-only unless stated otherwise. Run them only against images, registries and clusters that are in your written scope.
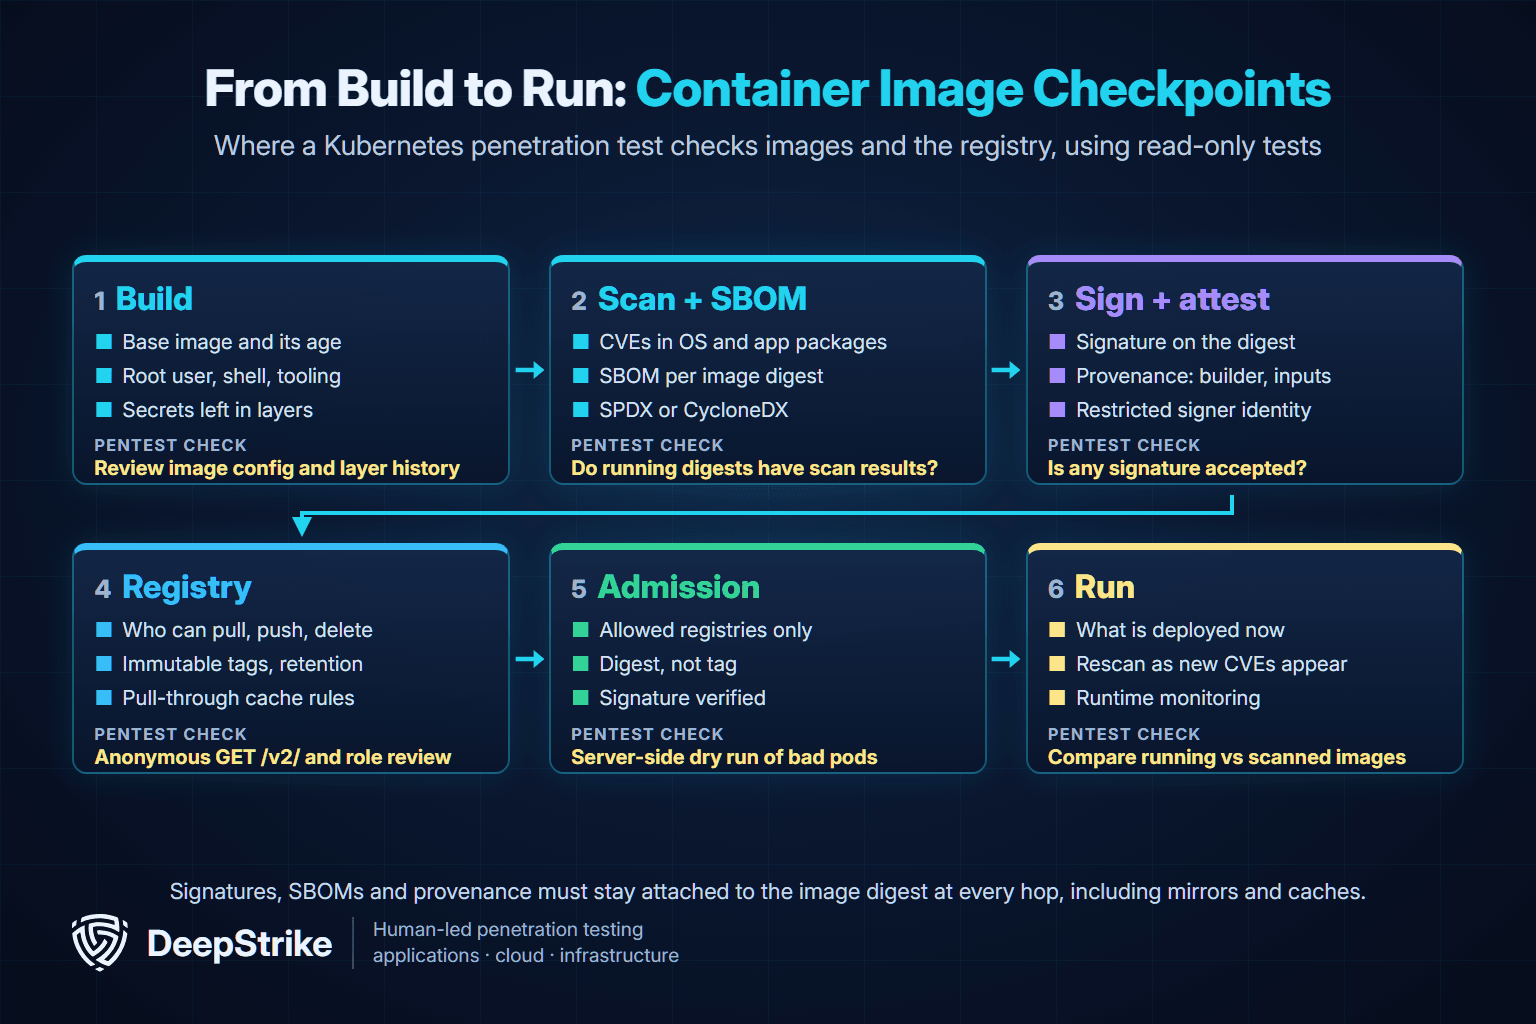
Container image checkpoints from build to run
Most application images are a thin layer on top of a base image, so a weak base is copied into every service built from it. Start by listing the images that are actually running, not the ones the team believes are running. With read access, kubectl get pods -A -o jsonpath="{..image}" returns every image reference in the cluster. Compare that list with the approved base images and application images, then review each base for the points below.
User field in the image configuration and the pod's securityContext settings such as runAsNonRoot and runAsUser.latest, or by digest? The Kubernetes documentation on images advises against :latest in production and notes that digests are immutable while tags can be moved..git folders, private keys or build credentials? A file deleted in a later layer still exists in the earlier one, so review the image history and every layer, not only the final filesystem.Container vulnerability scanning compares the packages inside an image with vulnerability databases and vendor advisories. Scanners read operating system package metadata and language manifests, such as lock files and installed packages for Python, Node.js, Java and Go, and report the CVEs that match each version. Common open-source scanners include Trivy, Grype and Clair. Docker Scout and the scanners built into registries such as Amazon ECR, Azure Container Registry, Google Artifact Registry and Harbor do the same job inside the platform.
For a pentester, the scan report is evidence, not the finding. Scanners can miss software copied into the image without a package manager, statically compiled binaries and anything whose package metadata was removed. They can also over-report: Linux distributions often backport fixes without changing the upstream version number, and many listed CVEs sit in code the application never loads. Prioritize CVEs that are fixable, present in images that are actually running, and reachable from the network or from untrusted input. Exploitation signals such as the CISA Known Exploited Vulnerabilities catalog help rank them, the same way a risk-based vulnerability management program would.
Scanning at a single point in the pipeline is not enough, because new CVEs are published against images that have not changed. Check where scanning happens and what each point can and cannot catch:
| Scan point | What it catches | What it misses |
|---|---|---|
| CI build, before push | Vulnerable packages and misconfigurations before the image is published; can fail the build | CVEs published after the build; images built outside the pipeline |
| Registry, on push | Every image that enters the registry, including manual pushes | New CVEs, unless images are rescanned; images pulled from other registries |
| Registry, scheduled rescan | Newly published CVEs in stored images | Whether the image is still deployed anywhere |
| Admission, at deploy time | Images that skipped scanning or fail policy, blocked before they run | Workloads that were already running before the policy existed |
| Running workloads | The real exposure: what is deployed now, by digest | Images that will be deployed next |
A useful and safe check in a Kubernetes pentest is to compare the digests running in the cluster with the digests the scanner has results for. Images that run but were never scanned, or were scanned only under a tag that has since moved, are a frequent gap between the security dashboard and reality.
A software bill of materials (SBOM) lists the components inside a piece of software. CISA describes an SBOM as a nested inventory of the ingredients that make up software components. For containers, an SBOM is generated per image, usually in the SPDX or CycloneDX format, with tools such as Syft, Trivy or Docker BuildKit's SBOM attestations. The Kubernetes project itself publishes a signed SPDX SBOM for its releases.
The value shows when a new vulnerability is disclosed: teams with SBOMs can search an inventory for the affected component instead of pulling and rescanning every image. In a test, check that an SBOM exists for each deployed digest (not only for the source repository), that it is stored with the image or in a system that can be queried, and that it matches what is in the image. An SBOM generated from source code can miss everything the base image adds. For the wider risk, see our guide to software supply chain attacks.
Signing binds an image digest to an identity, so a cluster can tell an image your pipeline built from one that merely uses the same name. The most common open-source options are Sigstore Cosign, which supports keyless signing with short-lived certificates tied to an OIDC identity, and the Notary Project's Notation. The Kubernetes release process signs its own release artifacts and control plane images with Cosign, and the Kubernetes documentation shows how to verify them.
Provenance goes one step further. A SLSA provenance attestation records the build platform that produced an artifact, the build definition it ran and the dependencies it resolved, so you can confirm that an image came from your CI system and your repository rather than from a developer laptop.
What to test
An admission controller intercepts requests to the Kubernetes API server after authentication and authorization, but before the object is stored. That is where image rules are enforced: allowed registries, digest-only references, required signatures or attestations, and scan results. Built-in options include ValidatingAdmissionPolicy, which uses CEL expressions and has been stable since Kubernetes v1.30, the ImagePolicyWebhook plugin and AlwaysPullImages. Signature and attestation checks usually come from policy engines such as Kyverno, OPA Gatekeeper with Ratify, or the Sigstore policy-controller.
AlwaysPullImages deserves a specific check in multi-tenant clusters. It forces every new pod to pull its image, so the registry checks credentials each time. Without it, once an image has been pulled to a node, any pod scheduled there can use that private image by name, without the credentials that pulled it.
You can test admission rules without running anything. A server-side dry run (kubectl apply --dry-run=server -f pod.yaml) sends the request through admission but never stores the object. Only webhooks that declare sideEffects: None or NoneOnDryRun are called for dry-run requests; if another webhook matches, the dry run is rejected, which is itself worth recording. With permission, in an agreed test namespace, submit dry-run pod specs like these and record what is accepted:
| Dry-run test | Expected result | Finding if accepted |
|---|---|---|
| Image from a registry outside the allowlist | Rejected | No registry restriction; any public image can run |
| Approved registry, image referenced by tag only | Rejected, or rewritten to a digest if policy requires digests | A moved tag can change what runs without a deployment |
| Unsigned image, or one signed by an unexpected identity | Rejected | Signatures are produced but not enforced |
| The same tests in kube-system or another excluded namespace | Rejected, or the exclusion is documented and justified | Broad namespace exemptions bypass the image policy |
| Pod requesting privileged: true or a hostPath volume | Rejected by Pod Security Admission at the baseline or restricted level | An image policy exists, but workload hardening does not |
Also review the policy configuration itself. A webhook with failurePolicy: Ignore lets requests through when the policy engine is down or times out, and audit or warn modes report violations without blocking them. Both are common where enforcement was rolled out cautiously and never switched on.
The registry is the trust anchor for everything the cluster runs. If an attacker can push to it, overwrite a tag or poison a cached upstream image, every node that pulls that image runs their code, and most cluster controls will accept it. NIST SP 800-190 lists three registry risks: insecure connections to registries, stale images in registries, and insufficient authentication and authorization restrictions. A registry review for a modern pipeline adds two more areas: pull-through caches and image provenance.
Start with how the registry answers an unauthenticated client. The OCI Distribution Specification defines a base endpoint, GET /v2/. A registry that requires authentication normally answers with 401, so a 200 response to an anonymous client on a private registry is worth investigating further, read-only. Then review identities and permissions:
imagePullSecrets are ordinary Kubernetes Secrets. Anyone who can read Secrets in a namespace can read the registry credentials, and those credentials often allow more than pulling. Check their scope, and whether node or workload identities could replace static credentials.Testing push access against production repositories can change what runs in production. If write tests are in scope, use a dedicated test repository named in the rules of engagement, and prove access through permission reviews rather than real pushes wherever possible.
A tag is a pointer that can be moved; a digest is a hash of the image content and cannot be. Most registries, including Amazon ECR, Azure Container Registry, Google Artifact Registry and Harbor, can stop release tags from being overwritten through tag immutability or image locking settings. Check whether that protection is on for release repositories, whether CI identities can overwrite existing tags, and whether deployments reference digests.
Then look at the other end of the life cycle. NIST SP 800-190 flags stale images as a registry risk because old, vulnerable images stay available to deploy. A retention or lifecycle policy, plus regular rescanning of what remains, closes that gap.
Many teams route public images through a pull-through cache or mirror, for example Amazon ECR pull-through cache rules, Harbor proxy cache projects or Artifact Registry remote repositories. A cache improves availability, avoids upstream rate limits and gives you one place to scan and control third-party images. It also brings its own risks:
Provenance connects the source repository, the build, the registry and the cluster. Since version 1.1, the OCI Distribution Specification includes a referrers API that lists the artifacts attached to an image digest, such as signatures, SBOMs and attestations. In a review, confirm that the registry supports referrers (or the fallback tag scheme), that attached artifacts survive replication and caching, and that admission policy actually reads them. A provenance chain that breaks at the mirror leaves the cluster nothing to verify.
Use this summary to plan a registry review:
| Registry control | Safe check | Weakness to look for |
|---|---|---|
| Authentication | Anonymous GET /v2/ and catalog request, read-only | A private registry answers anonymous clients |
| Authorization | Review push, delete and admin roles for each identity | Developers and CI share broad push rights |
| Pull secrets | List imagePullSecrets and the scope of their credentials | Pull credentials that can also push |
| Tag immutability | Review repository settings; never overwrite a production tag | Release tags can be overwritten |
| Retention | Review lifecycle rules and the age of stored images | Old, vulnerable images remain deployable |
| Pull-through cache | Review cache rules, who can trigger caching and refresh behavior | Any public image can be cached and deployed |
| Provenance | Check attached signatures, SBOMs and attestations for each digest | Signatures missing on mirrors or never verified at admission |
Registry and image findings usually chain with cluster findings: a token read from a pod that can push to the registry is a path to code execution on every node that pulls the image. DeepStrike's cloud penetration testing services include container and Kubernetes security assessment, covering containerized applications, Docker configurations, Kubernetes clusters and service mesh security, along with infrastructure-as-code and CI/CD pipeline testing. To build these checks into delivery, see penetration testing for DevOps; for the cloud configuration around the registry, see our guide to CSPM tools.
Below are typical chains a pentester should attempt to demonstrate impact.
https://api.example.com:6443 responding to unauthenticated queries.Impact: full cluster visibility and external resource compromise.
http://master.example.com:2379.kube-system secret blobs, TLS certs).Impact: cluster takeover via direct control-plane data compromise.
Impact: lateral movement within cluster and possible cluster admin compromise.
imagePullPolicy: Always, runs the replaced image.Impact: code execution in every workload that pulls the image. Demonstrate it through permission reviews and, only if agreed, a harmless marker image in a dedicated test repository. Never replace a production image.
Below are conceptual examples of commands for these checks. Run them only against systems you are authorized to test.
curl -k https://<api-server>:6443/api/v1 check for unauthenticated JSON.curl http://<node-ip>:10255/pods list pods (if exposed).etcdctl --endpoints=http://<etcd-ip>:2379 get / --prefix --keys-only see keys if unauthenticated.curl -k https://<api-server>:6443/version — check whether version information is exposed without authentication.kubernetes, kubeconfig, apiVersion, imagePullSecrets to find accidental leaks.When you find a positive result on a check, assess:
A small leak (e.g., read-only kubelet) may be low immediate severity but often enables lateral steps that escalate impact.
Apply these prioritized hardening steps:
Pair these cluster fixes with the container runtime baseline in our container security checklist.
When you deliver a pentest report, include:
Use this checklist during a test. Mark results and follow with evidence.
/<api>/api/v1 responds without auth?gitleaks (repo secrets).nmap, masscan, curl, httpie, jq.kubectl, etcdctl, kubectl-debug / kubectl-cp, simple curl against kubelet/API, custom scripts.curl -k https://<api>:6443/api/v1 and curl http://<node-ip>:10255/pods. If any respond without authentication, treat that as high priority to investigate and isolate.etcdctl commands such as get --keys-only if authorized. If you find unauthenticated access, capture minimal metadata and report it immediately. Never write to etcd unless you have explicit permission.automountServiceAccountToken: true on many pods, and service accounts with cluster-admin privileges. Test by checking in-pod token mounts and attempting only read operations against the API with those tokens to confirm scope. Recommend least privilege and token minimization.kubectl (when you have creds), curl for endpoints, nmap for ports. For automated posture checks use kube-hunter and kube-bench (kube-hunter is no longer actively developed; Trivy can also scan live clusters). For manifest and IaC scanning use Trivy, Kubescape, or kubesec. Use each tool in read-only mode unless you have permission for intrusive tests.
Stay secure with DeepStrike penetration testing services. Reach out for a quote or customized technical proposal today
Contact Us
